Wednesday, December 12, 2012

Leftover Veggie Tray to Creamy Veggie Soup


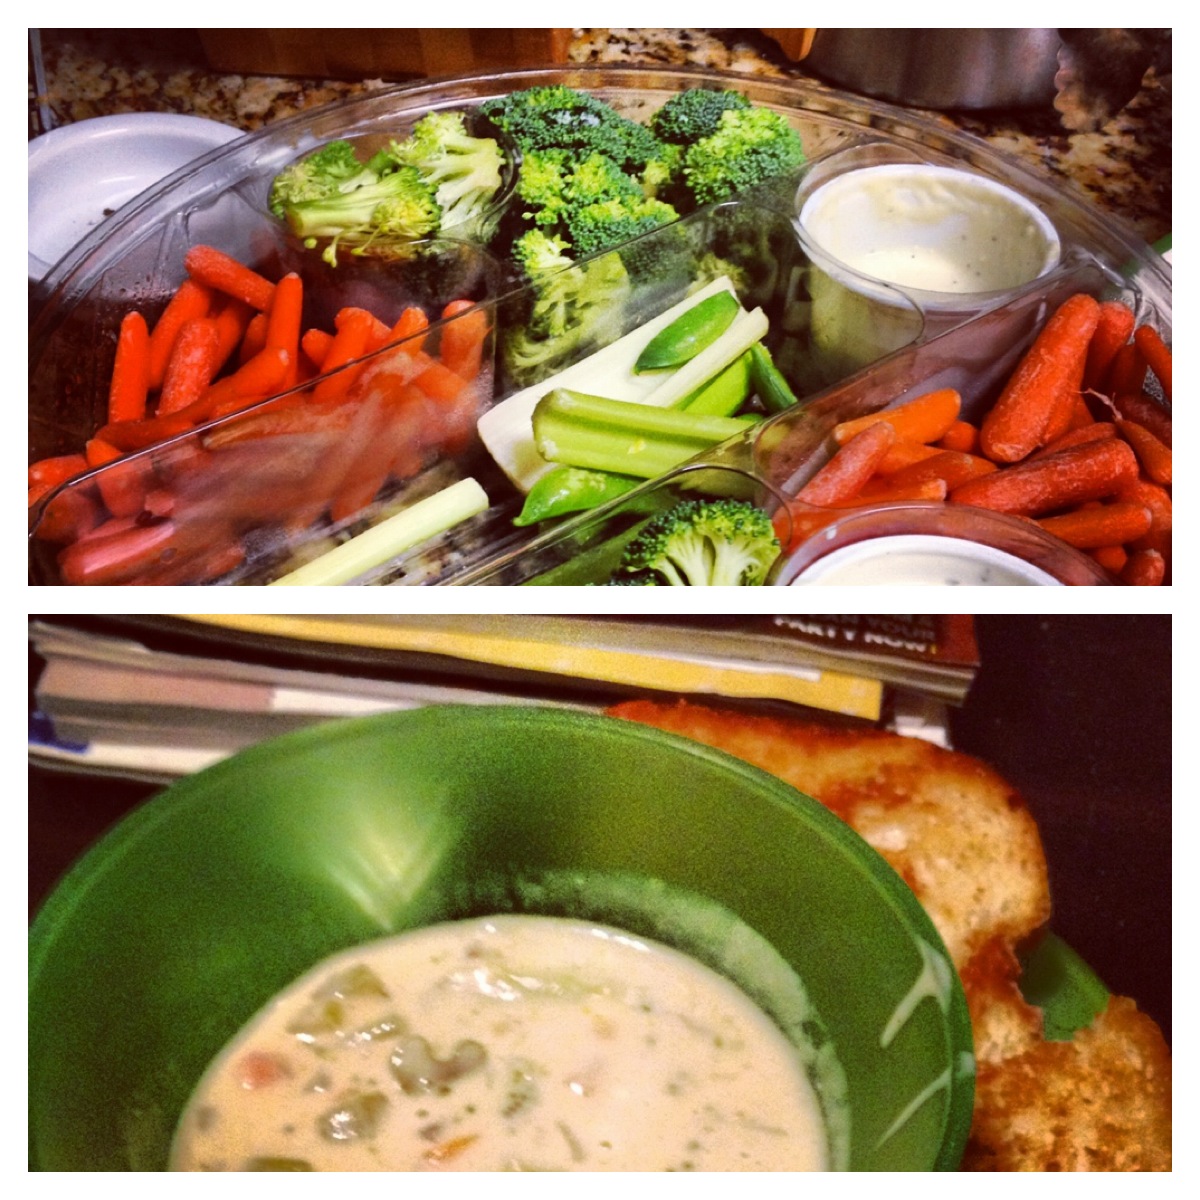
You know the veggie tray that is left at the end of every party that no one wants to take and it ends up in the trash? After reading this, you will NEVER leave behind another veggie tray again. Ever. In fact, I hope this post will inspire all out wrestling matches similar to those often seen at weddings between all the single ladies and the bride's bouquet. Yeah, this recipe is that good. And worth a black eye and bandaids if you are the victor of the veggie tray.


With the studio, I am often "blessed" with the leftovers from the parties. Monday night was no exception and I was left with not one, but two veggie trays in addition to a variety of other delicacies. I tried to push them on my bunco group the next night, but everyone only took the mandatory three carrots and one piece of celery. No one likes raw broccoli and I can't say I blame them. Anyways, I hadn't had soup in three days and was going through withdrawals (yes I have a soup problem) and with this cold weather, I don't know if I was shivering from the temperature or not having have had a hot liquid fix. So soup was on the menu for dinner. It was also one of those days that there was an NCIS marathon on USA and I was getting crafty (don't judge, it's my profession), so I didn't make it to the store. Based off a potato soup recipe I made recently, I had this idea for a vegetable version . . . OMG. It was awesome. The kind of awesome I kept sneaking back to the kitchen for and was ticked my computer was dead so I couldn't immediately blog about it awesome. Awesome.

***Disclaimer: This is one of those "flexible" recipes . . . meaning I will try to be specific, but you kind of just got to go with it.***

Creamy Vegetable Soup

Ingredients:
- Left over veggie tray (carrots, celery, broccoli, snap peas, and anything else that might be on it)
- 1 Onion
- 1 can Cream of Chicken soup
- 1 can Creamy Portabella Starter (Progresso) or 2 cans of Cream of Mushroom 
- 1/4 cup Chicken Broth
- 1/2 tsp Salt
- 1/4 cup Milk
- 4 oz Cream Cheese (room temp)

*Note: This was made in my small crock pot so keep that in mind

Directions:
- Chop veggies and onions. I filled my small one about 3/4 the way full. 
- Add soup, liquids and salt, stir well
- Cook on high for 4-5 hours or on low for 6-8 depending on your crock pot (yes they all have different definitions of "low")
- Add cream cheese and cook for 30 min more

Oh yeah . . . did I mention that it's one of those really easy recipes? Because it is. And the best part . . . I didn't buy the veggie tray! All the ingredients I just happened to have in my kitchen and it could be made "healthy" with the better for you soups and fat free cream cheese! Oh yeah, and you are getting your veggies! This soup definitely satisfied my soup habit and I cannot wait to snag the leftover veggie tray at the next together. Yes I will throw elbows for it!

PS - Excuse the service ware. We went with the colored plastic instead of the breakable ware. Our breakable bowls suck for soup so we stuck with the faithful colored plastic bowls. Also, my veggie tray pic was after I chopped the veggies . . . yeah, it was a big veggie tray.

Monday, November 5, 2012

Tiramasu Brownies

Yes you read the title of this post correctly . . . Tiramasu Brownies. I will just go ahead and say, "You're welcome!" now because trust me, you will be thanking me later for this recipe that will put you in a heavenly sugar bliss. 

This is one of those simple recipes. And by simple, I mean 1) it's really easy and 2) you can't really mess this one up. Not mention this recipe has a lot, and I mean a lot, of ingredients that are delicious on their own so by pure common sense, when united together they create pure fantasticalness! (Yes, "fantasticalness" is a word according to my automated spell checker.) So now that I have raved about this dessert, here's how it goes:


Tiramasu Brownies

1 box brownie mix (for 13x9 pan) + ingredients to make brownies (I told you it was simple!)
2 small boxes cheesecake pudding mix (white chocolate or vanilla will work in primitive conditions)
1 cup milk
20 crushed Oreos (I didn't lie about delicious ingredients)
1 16 oz container whipped topping
1/4 cup instant coffee granules 
2 tablespoons chocolate morsels or 1/2 of a Hershey's Bar
1/4 teaspoons cinnamon

1. Prepare brownies as directed on the back of the box in a 9X13 pan. Let cool       completely.
2. In a bowl, combine milk and instant coffee granules.  Add half the
    whipped topping and all the pudding mix; whisk until smooth.  

3. Coarsely chop the Oreos and fold into pudding mixture. 
4. Spread filling over brownie.
5. Spread remaining whipped topping over desert. 

6. Grate chocolate morsel over the brownie and garnish with a sprinkle of cinnamon.
Yield 20 servings 


Extras: 

  • I have also added Baileys to the oreo/pudding mix . . . not too shabby . . .
  • Use an additional 8 oz container of whipped cream to pipe around the dessert to make it pretty
  • Sprinkle with mini holiday m&m's for a festive touch
  • Not a coffee lover, don't worry about the coffee. If coffee is your lifeline, add more!
  • FYI: the cheesecake pudding mix comes in a sugar free version as does brownie mix, whipped cream, and Oreos in case you need a less-sugar-yet-still-delicious kind of dessert

Monday, September 24, 2012

Pumpkin Cream Cheese Cake Balls

I've always been quite fond of those little bites of goodness called cake balls. Of course I always have to bring something delicious for Bunco and since it's fall, I thought I would try my hand at cake balls and why not pumpkin ones. These little treats were also well loved by all at the tailgates and other gatherings. They are a little time consuming, but the first bite will be well worth your time.


Pumpkin Cream Cheese Cake Balls

1 box Duncan Hines Spice Cake Mix
1 can pumpkin
1 block cream cheese, softened
1 tsp vanilla
1/4 cup powdered sugar
1 package of white chocolate bark
Sprinkles, Nuts (Optional)

1. Preheat oven to 350 and spray the baking dish of your choice with cooking spray.
2. Combine cake mix and pumpkin until well mixed and pour into your dish.
3. Bake according to directions.
4. Allow cake to cool completely.
5. Using a beater, beat cream cheese, vanilla, and powdered sugar to make the icing.
6. Using a fork to shred the cake, transfer the cake crumbs into a large bowl.
7. Add the cream cheese icing and combine until mixed.
8 . Using a melon baller or small scoop, form small balls and place on cookie sheet lined with wax paper (You will have a couple or more depending on the size of your cookies sheets)
9. Place in freezer for 30 minutes. Meanwhile, melt the white chocolate bark in double boiler on low heat with a tablespoon of milk.
10. Using a fork, dip cake ball into the chocolate and tap on the side to shake off excess chocolate. Place back on cookie sheet and top with sprinkles or nuts if desired. Repeat until all the cake balls on the cookie sheet have been covered and place the sheet back in the freezer for another 10 minutes. If chocolate starts to thicken, add a tablespoon of milk.
11. I like to place mine in mini cupcake wrappers for easy serving purposes.

These little fabulous delights scream fall and taste even better!

The Original Jalapeño Popper Dip Recipe

Probably one of my most favorite dips! Always a crowd pleaser. I generally use just one jalapeño, but you can add more or keep the seeds to add a little kick! And don't forget an extra half for the signature garnish!


Jalapeño Popper Dip

2 blocks cream cheese, softened
1/2 cup mayonnaise
1 jalapeño, seeds removed and finely diced
1 4 oz can green chilies
1 pkg/jar of real bacon pieces
3/4 cup parmesan cheese, divided

1. Preheat oven to 350
2. Place the cream cheese in a small baking dish and place in oven for 5 minutes.
3. Remove cream cheese from oven and add mayo, combine until well mixed.
4. Add the rest of the ingredients, reserving a 1/4 cups of the parmesan cheese and a small amount of bacon pieces and jalapeño.
5. Top the dip with the remaining parmesan cheese, jalapeño, and bacon pieces.
6. Bake at 350 for 30 minutes uncovered.

We enjoy this dip with Frito Scoops and it has been a popular dish at all the gatherings and tailgates. There are a few versions of this recipe roaming around, but this has by far been declared the best!

Note: The picture above is a double recipe to meet the demand

Thursday, September 20, 2012

Pumpkin Cream Cheese Muffins

In addition to the weather, leaves changing, and decorations, nothing says "Fall" better than the smell of pumpkin treats baking in your oven. With the change in weather already occurring, the itch to get my fall decor has been intensely growing. So today, up went the fall decor and in the oven went the first batch of pumpkin treats - Pumpkin Cream Cheese Muffins.


These are an incredibly easy, but absolutely delicious treat that will fill your home with the smell of fall happiness (there are no words to describe the bliss that is still overtaking the house as my fingers fly over the keys trying to describe the joy). I used a spice cake mix in order to use something out of the pantry as Daniel has declared I have a couponing habit (I call it being thrifty), but you can use a spice cake recipe eliminating the wet ingredients. Even better news, these babies are semi-healthy as the oil and eggs are replaced by pumpkin and pumpkin alone. With fat free cream cheese, these little joys can become a fall staple in your kitchen.

Pumpkin Cream Cheese Muffins

1 box  Duncan Hines Spice Cake Mix
1 15 oz can of pumpkin puree
1 8 oz block cream cheese
1/4 cup powdered sugar
1/2 tsp cinnamon
1/2 tsp vanilla

1. Line a cupcake pan with 12 cupcake papers and spray with cooking spray. Pre-heat oven at 350
2. Combine the cake mix and pumpkin until well mixed
3. Beat the cream cheese with powdered sugar, cinnamon, and vanilla until fluffy.
4. Fill the cupcake wrappers half full and use a spoon to make a little well in each cupcake.
5. Place a heaping teaspoon full of cream cheese mixture into each center.
6. Cover with remaining pumpkin batter. 
7. Bake at 350 for 25 - 35 minutes (I use stoneware so my baking times are a little longer).

Optional: I sprinkled mine with oatmeal and cinnamon sugar for decor.

Don't worry if they are full going into the oven as my picture shows below. They will not rise as much as they normally would had you used eggs and oil.


Now assuming your fall decor is already up, your house is ready for fall!

Side comment: Does anyone put their pumpkins and turkeys out at the same time? I have convinced myself that this is completely normal as my fall comes down the week before Thanksgiving in order for Christmas to go up. By putting them out now, I am able to give my turkeys as much face time as possible.  And my jack-o-lanterns get turned around after Halloween to be just pumpkins. Totally normal . . . right?

Thursday, July 12, 2012

Grilled Chicken & BLTA Salad with Avocado Ranch

I have always loved bacon. There is no better smell to wake up to in the morning and it is a Sunday staple along with honey buns and strawberries every Sunday morning at camp. This summer, my love for bacon has dwindled, said no one ever!  I have however, been working on my salads this summer and came up with this one in my head a few weeks ago, a BLT salad with grilled chicken. And since I am currently obsessed with avocado and bacon and avocado would BFFs in life, I knew the avocado was a must. Now, if you know me, you know I am not a salad dressing kind of girl, but my favorite boyfriend is. This led me to concur to that an avocado ranch salad dressing would pair nicely with my BLTA AND it is possible to make a healthy version as I did! Now, I did use 6 pieces of bacon for the 2 of us, but we are bacon lovers in this house. I recommend you don't skimp on the bacon as it is the first letter in BLTA, which means there should be more bacon than anything else . . . . right?


Grilled Chicken & BLTA Salad with Avocado Ranch

Ingredients:

2 chicken breasts, grilled and sliced (we love the HEB grilled strips in the freezer aisle)
6 slices thick cut bacon*, cooked and drained
1 large head romaine or any other lettuce/mix you love
2 Hass avocados
1/2 cup grape tomatoes
2 oz fat-free sour cream
1/4 packet ranch mix
1 tbsp milk
hard boiled egg, optional

Directions:

1. Boil eggs and cook bacon until crisp. Set bacon aside to drain and place cooked egg in ice water.
2. Heat chicken in skillet while you wash and chop the lettuce. Top lettuce with tomatoes and one sliced avocado.
3. Roughly chop the bacon and add to salad along with chicken and hard boiled egg.
4. Dressing: process remaining avocado, ranch mix, sour cream, and milk until smooth.

I served this hearty salad with grilled corn on the cob for a perfect summer dinner!


 *  A side note about this bacon: we have a family tradition of purchasing those bright red weenies from the Taylor Meat Market in Taylor, Texas that is located just Northeast of Austin. On my last trip, I picked up a pound of bacon on a whim. OMG! This was the bacon I used in the salad tonight and could eat three meals a day plus snacks in between (it's low-carb right . . . . ?). I highly recommend picking up bacon from your local meat market for this salad! And if you are ever near Taylor, Texas, stop by the Taylor Meat Market located at Hwy 79 and Hwy 79 Business for some Taylor Weenies and bacon!

Saturday, June 9, 2012

Lemon Mascarpone Tarts with Fresh Raspberries

These little babies scream summer at the top of their lungs! What is not to love about a crisp lemon flavor twisted with ripe raspberries and a sweet and sugary butter cookies crust? Absolutely nothing! These beauties are satisfying and run in the same race with Lemon Meringue Pie and Lemon Pie . . . Arrowhead and Honey Creek girls, remember those mini lemon pies we used to go nuts for? It's the "Filling Station" all grown up!


Lemon Mascarpone Tarts with Fresh Raspberries

Crust:
1 1/2 pkgs Pepperidge Farm Chess Cookies
1/2 cup butter, melted
1/4 cup powdered sugar
1/2 tsp almond extract


Filling:
1 14oz can sweetened condensed milk
1/2 cup fresh lemon juice
2 tsp lemon zest
6 egg yolks
1 8oz container mascarpone cheese


Toppings:
Raspberries or any other fresh berries 
Whipped cream


Directions:
1. Process cookies in food processor until they are a fine crumb. Using a pastry cutter or fork, combine cookie crumbs with butter, powdered sugar and almond extract. Divide mixture into 8 mini tart pans and press firmly. Bake at 350 for 10 - 12 minutes until edges start to tan. Cool for 30 minutes.


2. Combine sweetened condensed milk, lemon juice, lemon zest and yolks. Add mascarpone cheese and whisk until well blended. Divide amongst tart shells and bake 12 - 15 minutes at 350. Remove from oven and let cool 1 hour. Chill for at least 4 hours before serving.


3. Top with fresh berries and whipped cream. 


You will not be disappointed in the joy this desert will bring to your pie hole!

Sunday, May 27, 2012

White Chocolate Raspberry Cheesecake Cupcakes

These delightful treats were created quite by accident, but will definitely stick around in our house!  Below is the white cupcake with a white chocolate raspberry cheesecake filling and a white chocolate icing. These guys sure do not disappoint!


White Chocolate Raspberry Cheesecake Cupcakes

Cupcake:
1 pkg white cake mix or any white cake recipe + ingredients listed

Filling:
1 pkg frozen raspberries
1 8 oz block cream cheese
1/2 cup powdered sugar
2 oz white chocolate
1 tsp milk

Icing
1 small pkg white chocolate instant pudding mix
1/2 cup + 1 tsp milk
2 oz white chocolate
1 cup whipped cream

Directions:

1. Make cupcakes according to directions. I find that filling the cup 3/4 of the way full and baking at 325 F makes a bigger and better cupcake.  Let cupcakes cool completely.

2. Use a mixer to combine powdered sugar and cream cheese. Microwave 2 oz white chocolate and 1 tsp milk for 30 seconds. Stir until chocolate is completely melted and combine with cream cheese. Stir in raspberries. 

3. Combine 1/2 cup milk and white chocolate pudding mix until mixture is thick. Microwave 2 oz white chocolate and 1 tsp milk for 30 seconds. Stir until chocolate is completely melted and combine with pudding mixture. Fold in whipped cream

4. Using a table knife, cut a circular center from the top of the cupcake, about 2/3 the depth of the cupcake, and remove cake piece. Cut off the top of the piece and save. Fill the center in the cupcake with raspberry filling and replace the top of the cup cake. 

5.  Pipe icing on cupcake. 


Berry Cheesecake Cobbler

After finding one of my favorite berries (and one of the pricier ones!) for a reasonable price this week at Sam's Club and several containers of blackberries already in the fruit drawer, I decided it was time for the first cobbler of the summer: Berry Cheesecake Cobbler!


I found a simple recipe and added my own twist. The results were absolutely delicious! I've also made the recipe with 1-6 oz container each of the berries and 6 oz give or take (more like give) of frozen mixed berries with results being SPECTACULAR!


Berry Cheesecake Cobbler

5 tbsp butter
1 cup flour
1 1/2 cup sugar
3/4 cup milk
1 egg
1 1/2 tsp baking powder
1 tsp vanilla
8 oz cream cheese
1 - 12 oz container raspberries
1 - 6 oz container blackberries

1. Pre-heat oven to 350 F.
2. Melt butter and pour into bottom of your dish (7 x 11 or about that size.
3. Combine 1 cup sugar with flour, milk, egg, and baking powder and add to your dish. Do not stir.
4. Sprinkle berries over batter. Do not stir.
5. Combine 1/4 sugar with cream cheese and place small dabs in spaces between berries. Do not stir.
6. Combine remaining 1/4 cup of sugar and vanilla. Sprinkle sugar evenly over berries and cream cheese.
7. Bake at 350 F for 45 minutes to 1 hour depending on baking dish or until top is brown (I used stoneware and it took a full hour).
8. Let cool for 10 minutes before serving. Serve with vanilla ice cream or whipped cream.

We topped ours with frozen whipped cream and there were no complaints!